-
Aishwarya Dwarakanath, Montessori Guide & Consultant
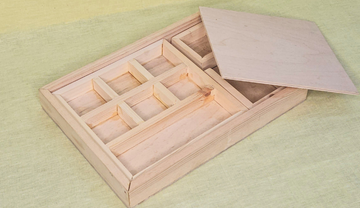
The Art Box by Ariro is designed based on the Gluing box that is found in Montessori Toddler classrooms. Although used solely for the purpose of gluing shapes onto paper (which for a Toddler can be challenging and a fun process!) as your child grows, you can come up with innovative ways to use the art box and later even as a lovely tray to store your everyday knick-knacks!
The art box comes with a large tray, compartments for art items and gluing brushes, a small box for a glue bottle and a paper tray. The lid can be reversed and used as a working area. Provide a sponge and piece of cloth for the child to wipe of excess glue from the lid and table.
Here are 10 activities that can be done with the Art Box with minimal preparation.
- Stringing beads: Pick out a few differently coloured beads that are big enough for little hands to control. Sort them into the compartments based on colour, shape or size. Take a long thread and stiffen the edges using glue. Tie a knot on one end. Show your toddler how to string the beads onto the thread. As the child grows, this box can be used to make jewellery as well!

- Nature collage: Why stick to paper when you can make art from nature? Go on a walk with your toddler and pick up small leaves, twigs, seeds and feathers. They’re pretty good at spotting tiny little treasures! Place strips of carboard in the paper tray or some white paper. Show your toddler how to stick the items onto the paper/cardboard. You might end up with a beautiful piece of artwork for the walls!
- Rangoli powder box + chalk: Fill up the compartments with rangoli powders of different colours. Ensure they are organic and safe for your little ones. Your 3-6 year old will enjoy drawing on the lid with a piece of chalk and filling it up with rangoli powders. Wipe off the lid and try again the next day!
- Coin rubbings: Fill up the compartments with coins of different denominations or even from different countries. Place the coin on the lid and a paper on top of the coin. Using a pencil, show your child how to shade over the paper. The joy on their faces as they see the coin rubbings will make your day as well.

- Tearing paper for collage: Place some coloured papers into the paper tray. Show your child how to hold the paper, tear off pieces and place it into the compartments. Model sorting the paper pieces based on colour. Later, the same pieces of paper can be stuck onto a white sheet of paper using a glue bottle and brush. Toddlers don’t need an outline to fill, they can stick wherever they like on the sheet.
- Seasonal activities: Is it Diwali or Pongal? Use the compartments to store tiny stickers, mirror pieces, or glittering ‘chumkis’. Stick them onto a little diya or pot! For Christmas, you could use the box to decorate a Christmas tree ornament! The options are endless.
- Clay cookie cutters: Clay really helps toddlers with their fine motor development. Moulding clay is not just fun, it involves intricate movements and a lot of pressure using the fingers. The sensory feel is an added bonus. Provide one colour of clay (preferably natural clay) in the paper tray. Store your cookie cutters and shaping tools in the compartments. The lid acts as a perfect base for your little Michelangelos!

- Lego base: Is your child trying out a new Lego model? Use the compartments and trays to sort out the pieces based on colour. The lid acts as the working space. No more excruciating pain from stepping onto Lego pieces strewn around (hopefully)!
- Sorting beads and grains: You’ll notice that one of the compartments is longer- for glue brushes and other tools. Fill up this compartment with a mix of 6 types of grains or beads. (they could differ in colour, shape, size or texture). Show your child how to sort out the grains into the 6 smaller compartments. A child of 4-5 years can be asked to do this challenge with their eyes closed if the beads are of different shapes or textures.

- Punching shapes: Any stationery shop nearby will have punching machines that are child- sized and can punch out interesting shapes like teddy bears and stars. Show your child how to slide in the paper and punch out some cute shapes on the lid! The cut out shapes can be placed into the compartments.

The Art Box truly is versatile and can be used for various reasons. Some bonus ideas include using the compartments for counting numbers from 0-5 with beads, pasting feathers and gemstones onto a hair band, and even storing your child’s everyday stationery.
One fun idea for the adult is to use decoupage or chalk paints to paint the lid and sides of the box in an attractive manner. Can you imagine your child’s joy as they discover new treasures to create art with when they open that lid?


